

And if longer hair is more your style, check out part one of this article, An Introduction to Painting Realistic Hair in Adobe Photoshop.
1. Understanding Short Hair
From pompadours to spiky hair and bowl cuts, there are many types of short hairstyles you can create. Today we'll cover two trendy styles that are commonly worn and used in art.Follow the Direction
No matter the style you choose, one rule remains the same. For the best results, paint according to the direction the hair grows out of the head.Let's take a look at this idea in action...

Challenge Yourself
If you're new to painting hair, you may be tempted to slap the colors on quickly without giving the structure much thought. Even though it's the easy way out, challenge yourself to stay away from painting dull and lifeless hair. Attempt hairstyles that you would normally stay away from and study different curl patterns for interesting looks.
Pick the Right Hair Photos
I can spend hours going through stocks. Pick photo references that are clear and well lit so that you can easily determine how the hair should be painted. And if you're just starting out, pick hair colors that are easier to imitate for less confusion. Here are all the references I'll be using today:2. So Which Brushes Do I Use?
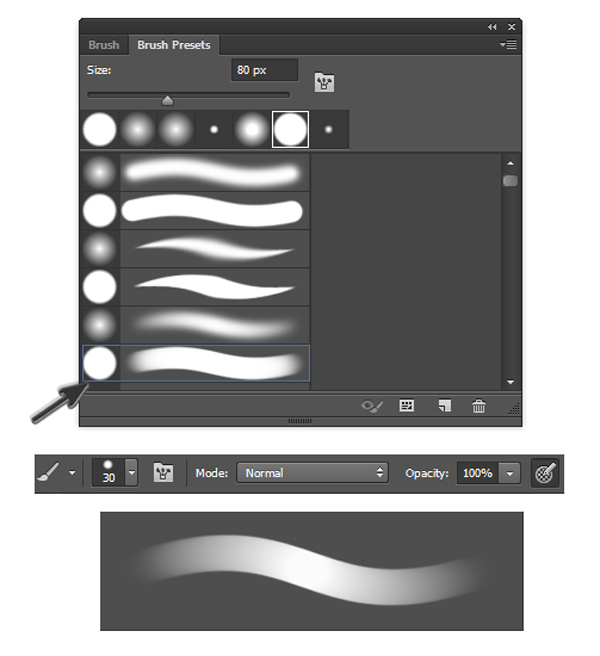
Brushes are a huge mystery to beginners, but the simpler the brush the better. Just like in the introduction article, I'll be using brushes from Adobe Photoshop's Brush Preset list.A basic Round Brush is super flexible in what you can paint. Experiment with the Hardness range to achieve blunt or soft edges for the effect that you need.


Custom Hair Brushes & Templates
Custom Photoshop brushes can instantly achieve the effect of realistic hair by painting multiple hair strands with one stroke. Choose this option if you're a little more advanced or would like to save time painting hair. You can also just use templates of hair to overlap your portraits instead. Here are two templates from Envato Market that I recommend.3. Paint Realistic Short Hair: The Pompadour
The pompadour is a mixture of class and style. Inspired by the heart-throbs of the 50s, the modern take on this retro haircut often includes trimmed or shaved sides.Step 1
Draw the pompadour sketch using the sleek tapered brush from earlier. I'll be using this first hair reference from PhotoDune to base the style on. Notice that the top portion of the hair moves backward, while the hair on the sides moves downward.
Step 2
Paint a solid brown color for the base of the hair color. Make sure this layer is underneath the sketch layer. Set a New Layer as a Clipping Mask to the base and make sure to change the Blend Mode to Multiply. Use this new layer to begin painting the shadows using the same brown color from before.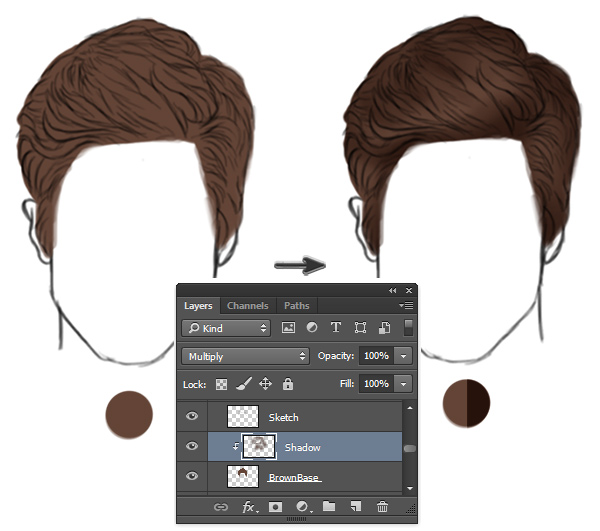
Step 3
Set more layers as clipping masks if you need to paint more shadow. Then create a New Layer and set it Overlay. Set your Foreground Color to white to begin painting warm highlights to show where the light is hitting. Continue intensifying the lighting, and make sure the light follows a path that makes sense for your painting.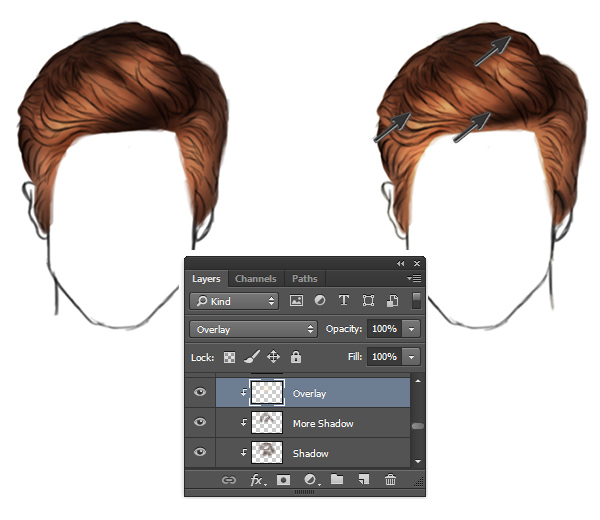
Step 4
You can take away the harshness of the black sketch by blending it into the painting. Do this by setting the Sketch Layer to Overlay. Then, on a New Layer set to Linear Dodge (Add), paint bright highlights by picking light tan colors from the surrounding areas.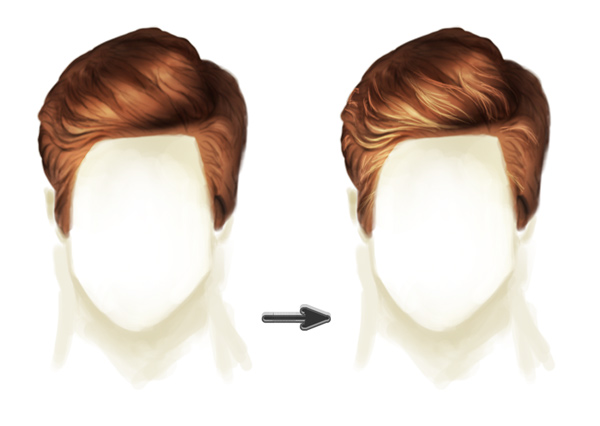
Step 5
Color correct the hair with an Adjustment Layer. Go to Layer > New Adjustment Layer > Color Balance and adjust the settings to deepen the red, blue, and magenta tones of the hair.
Step 6
Now that the color is corrected, use this step to refine the details of the painting. Adjust the Brush Hardness to 100% and make sure that you paint an arch to represent the hair line.
Step 7
Continue to refine the painting. Lower the Brush Size to paint fine, wispy pieces of hair along the edges of the head. Finish the hair by adding a nice gradient backdrop behind it. Paint environmental light from the backdrop to make the hair appear more realistic by allowing it to fit into the scene.
4. Paint Realistic Short Hair: Full & Layered Cuts
For this next hair style we'll be painting a full and textured look, complete with layers that give the hair incredible body.Step 1
Pick a different hair reference from PhotoDune for your paint study. Using the same brush from before, sketch the face and hair. Notice the change in the directional path of the hair as it flows from the crown. Because the hair is longer and fuller, organize the hair into large blocks. We'll worry about the fine hair details later.
Step 2
Now paint the base colors for your sketch. Separate each color onto its own layer and set New Layers as Clipping Masks for the shadow. Again, set the Blend Mode for the shadow layers to Multiply and use the same colors from the base to paint the shadows in.
Step 3
Bring down the Opacity of the Sketch Layer to 25%. Now create two new layers, one set to Overlay, and the other set to Color Dodge. On the first layer, paint bright blue highlights. Then use the dark pink from the background circle to paint environmental highlights for an interesting effect.
Step 4
Lower the Brush Size to under 5 pixels and set the Hardness to 100%. Now it's time to paint the hair strands. Paint the hair strands following the direction each section of hair goes. Try to pay attention to which parts overlap one another, and start to clean up any messy edges.
Step 5
Set a New Layer to Linear Dodge (Add) to paint more intense highlights. Start incorporating environmental light from the background by painting pink onto the hair. These highlights will add a sense of crispness and shine to the hair. Allow some of the background to peek through so that the hair doesn't look bulky.
Step 6
Clean up the painting. Refine the hair with more highlights and paint additional strands to show its body and movement. Finish off the painting by adding a New Adjustment Layer for Levels to tweak the intensity.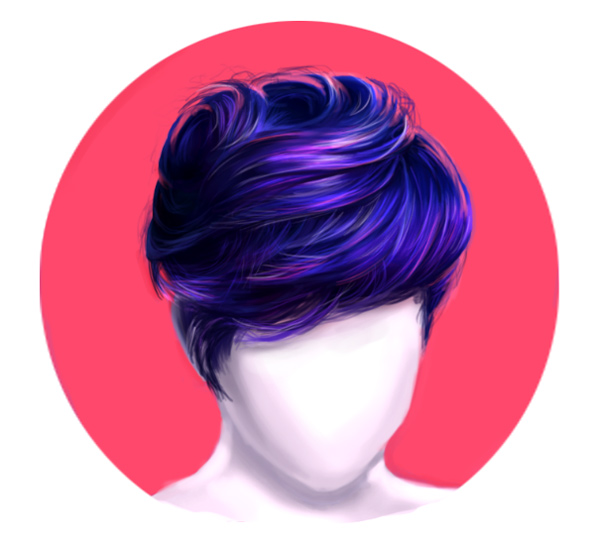
5. How to Paint Realistic Facial Hair
Another type of short hair we can't forget is facial hair. Although it's not on the top of your head, it behaves in a similar way. Let's take a look at the realistic painting process!Step 1
So you're probably used to the drill by now. Use this beard reference from PhotoDune for the final study. Start off with a clean sketch, paying special attention to the directional path of the hair. In this case, we'll keep in mind that the hair is moving downward as it grows out of the skin.
Step 2
Using the previous layer organizational tips, set up your base colors and bring down the Opacity of the sketch to 20%. Use a Soft Round Brush to paint the shadow for the beard on a New Layer set to Multiply. Facial hair will be greatly affected by the skin tone, so make sure to blend parts of the skin into the beard and mustache.
Step 3
On the same layer set to Multiply, begin painting downward strokes to represent the hair texture. Notice how these strands of hair curve inwards as they travel down the jaw and neck.
Step 4
Set a new layer to Overlay. Set the Foreground Color to White and paint highlights on the beard. Concentrate the highlights towards to the top where the light source would be hitting. Continue to develop the natural skin tones for a more cohesive piece.
Step 5
Time to make this hair come alive! Set a New Layer to Linear Dodge (Add) and begin painting thin strokes of hair for the highlights in the beard. Cluster the hair together in some places and show that hair is also coming from the top where the skin meets the beard and mustache.
Step 6
Continue painting the facial hair and highlights until you're happy with the result. Don't forget to paint stubble on the neck for more character. Add a nice gradient backdrop and boost the colors using a New Adjustment Layer for Curves.
Conclusion
Bringing hair to life is about paying attention to the way the hair moves as well as how it responds to light. Master these techniques and you'll create impressive hair in no time!Want to learn more about painting realistically? Check out some of my other articles on this topic here on Envato Tuts+!
Lot of info on your blog. Liked it.
ReplyDeleteDandruff TreatmentIn Bangalore